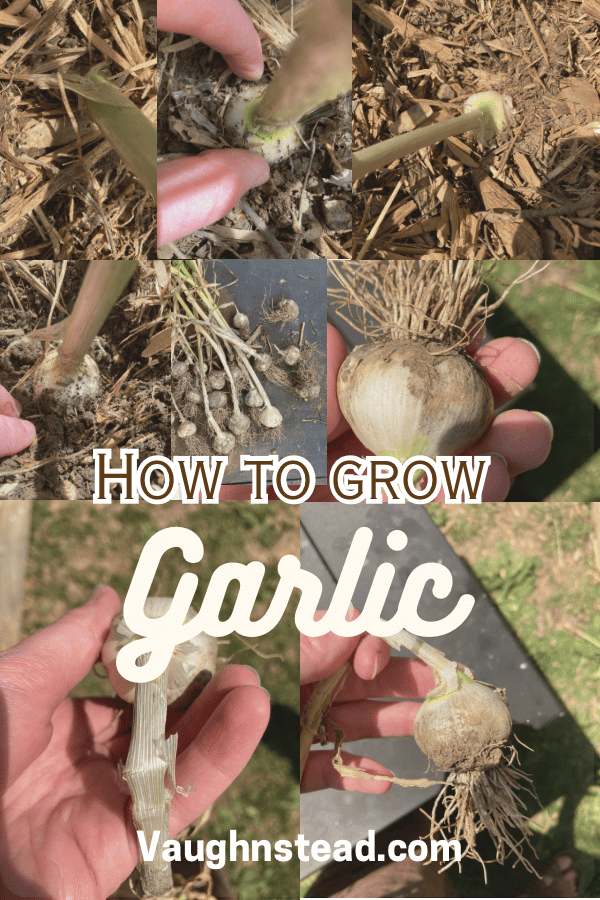
One of my favorite things to grow in The garden is garlic. With a little planning and some time, it is so rewarding! In this post I’m going to show you how to grow garlic, and share a handful of tips to bring you the best quality crop possible.
I consider garlic one of the easiest and most rewarding crops to grow.
there are two different main types of garlic; hard neck and soft neck.
Being I have currently only had experience with the soft neck garlic that is the variety I will focus on in the post.
while growing soft neck garlic and hard neck garlic is basically the same , hard and soft neck garlic do not have the same longevity when storing. From my understanding when stored properly, soft neck garlic stores longer.
Frequently asked questions:
- how to grow garlic from a clove
- How to grow garlic?
Here I will break it down and tell you my experiences, and what I’d do differently!
Where do I find garlic cloves to plant?
You can buy garlic to plant from:
- Local farm and garden suppliers
- Online
- or your local grocery store
If you are looking for a specific type of garlic or want to be sure it is heirloom etc, Buying seed garlic from a farm and garden supply store or online would be a straightforward choice.
I have used garlic cloves from the grocery store to grow my garlic and it has worked out great.
When to plant garlic
Planting garlic in the fall, between august and November is a good rule of thumb to follow.
I have generally planted my garlic in November and it has done pretty well.
Where to plant soft neck garlic
Plant garlic in full sun. They should get about six to eight hours of sun.
it is important to loosen or cultivate the soil well, before planting so that the cloves have plenty of room to grow unrestricted.
Where I currently live the ground is quite wet for several weeks at a time throughout the year, especially in spring.
To combat the soupy soil, Last year I planted the garlic in small hills so the excess water would run off.
it helped tremendously.
Add compost to your garlic rows.
Add compost to your rows of garlic
Add compost to your garlic rows, (already broken down) as it is rich as well as loose and helps the bulb to grow to a better potential with higher quality, larger bulbs.
garlic will still grow in less than perfect soils, they just will not be as large of a bulb.
the soil around garlic heads.
Mulch around your garlic
in addition to adding compost a layer of mulch is a good way to protect your bulbs through the harsh winter and maintain a good moisture balance. Just be sure not to bury the cloves to deep about 2” deep is enough.
mass the leaves start to emerge and the the bulb starts to form you will want the top of the garlic to “just” be covered lightly.
this helps any excess water to shed away from the main part of the bulb and also helps ensure the garlic can can form into a nicely divided bulb.
Remove soil around garlic heads
As spring comes in and the bulbs start to bulk up, take a spoon or small spade and carefully “spoon” out the soil around each bulb so that they have more room to expand. Picture attached for example, below.
afterwards, I like to add a light layer of mulch like leaf mold or cypress mulch from the store like this. I hear straw works really welll for this too. (And I imagine a bit cheaper in the long run than buying wood mulch.)
Why does garlic need mulch?
- mulching helps to regulate soil moisture.
- prevents soil from washing back and compacting around the bulbs .
- Suppresses weeds.
How often should water garlic?
Garlic does not like to be too wet. Ideally, water your garlic patch just enough to keep damp. So with spring rains you will not need to water very often however as it gets hotter you may want to water every few days. It is good to remember Garlic can handle a little drought.
Once you get closer to harvest stop watering the garlic so the soil has a chance to dry up a bit.
When to harvest garlic
Garlic will grow to have between 6-12 leaves that layer each other and wrap around the cloves forming that iconic papery skin that we all are used to.
once about 3-5 of the lower leaves have yellowed or turned brown it’s time to harvest.
for a cleaner bulb it is good to harvest when the soil is fairly dry.
harvest is mid to late summer, so depending on your usda garden zone, you will want to harvest between mid June to August.
How to harvest garlic
when the bottom leaves have turned brown you know it’s time to harvest your garlic!
if the ground is hard, use a spade or an old spoon to gently dig around each bulb, loosens the soil around its roots.
You want to take care and not damage the bulb.
Hold the plant At the base of the stems just above the bulb, and pull.
it is inevitable that there may be a few bulbs that get a little damage, whether it is a scrape or a gouge. Just use those cloves first and save the best for longer storage.
What is curing garlic all about?
Curing garlic is the process in which the garlic dries. When garlic does dry, the leaves get crispy and the outer skin of the cloves will turn papery.
it is important for garlic to be completely dry before any long term storage or you will have a bit of a mess and lose some of your garlic pretty quickly.
How to cure garlic
before curing your garlic you’ll want to decide how you will store it.
if you will be braiding and hanging your soft neck garlic, knowing that before hand will help you do Accordingly.
If braiding your garlic, do that just after harvest for easier handling.
once done braiding your garlic, or if you are skipping that step, proceed.
next you will want to choose a good location to keep your garlic for 3-6 weeks
typically most people cure their galric out side
some will hang the garlic plants upside down on a fence and other will use an outdoor table.
if using a table be sure to turn the heads often so the every side gets plenty of air circulation.
and if hanging, separately or in groups, allow for plenty of air circulation around each bulb
once the stems are completely dry and the skin is papery and y out can no longer feel “life” in the neck (between the head and the leaves ) it is cured.
once your galric is cured do a quick once over of each bulb.
- Trip the roots to the base of each bulb and remove any loose skin, and as much dirt as you can.
I personally removed the very outer layer of skin to get rid of the dirt and any other undesirable debris.
if you did not braid your garlic, then give it a nice trim from the old leaves.
for soft neck garlic trim so the garlic has about an inch of stem.
Set aside some garlic for next years crop
if you are pleased with the variety you have grown, be sure to set aside some of your garlic harvest to plant in the fall for next years crop!
for planting, pick the largest and best quality cloves so that your new crop will be the highest quality harvest as possible. The better the cloves you plant this fall, the higher the chance you’ll have a better quality crop of garlic next year. 🧄
store your seed garlic in a cool and dry place until you are ready to plant them.
Storing garlic
For a good long term storage, (about 6 – 12 months ) place your garlic heads in a cool dark place.
you can either hang your garlic by hook, or on rafters.
If you opted to skip braiding your garlic, an open paper bag, or even an open basket or wooden crate will work great.
Make sure there is plenty of air circulation so that they do not mold or sprout 🌱
This post was about how to grow garlic
if you enjoyed this article you will love these best tips for drying herbs
Tags: fresh garlic, gardening, herbs, Homesteading, How to grow garlic, sustainability